Joining Two Lines: Selecting the Right Bend for Boaters
Knowing how to securely join two lines is an important skill for a variety of tasks, from mooring to towing. Bends are knots specifically designed and used to unite two separate lines. Mastering a few of these key knots can make your boating experience safer and more efficient. Moving on from our previous episode about stopper knots, in this guide we’ll explore five essential bends. Understanding how to tie them, along with their strengths, weaknesses, and some handy tips, will ensure you’re well-prepared for any situation on the water.
What is a Bend?
To bend is to link up two cables or lines. Knots used to achieve this are called bends. Unlike other types of knots that might be used to attach a line to an object or to create a loop, bends are specifically designed to join two lines together. This can be particularly useful in boating for extending lines, creating makeshift repairs, or combining lines for added strength.
The key to a good bend is that it should be secure and easy to tie. When possible, it should also be easy to untie after bearing a load. Selecting the appropriate bend can depend on the intended use, as well as the diameter of the lines. You’ll note we specifically didn’t include in our list the reef knot. Most often, it’s not the right one to use. Which ones should you tie instead? Let’s dive in!
Sheet Bend
- How to Tie: To tie a sheet bend, start by forming a bight in the end of the thicker or more rigid line. Pass the working end of the second line up through this bight. Next, wrap the working end around both parts of the bight, tucking it under itself to secure. Tighten the knot by pulling both standing parts firmly. This knot is particularly useful when you need to join lines of different diameters quickly and securely.
- Strengths: The sheet bend is highly regarded for its simplicity and speed. That makes it ideal for situations where time is of the essence. It works well with lines of varying diameters, a common scenario on boats where lines can differ greatly. Additionally, it is reliable under load, providing a secure connection that boaters can trust in various conditions.
- Weaknesses: One notable weakness of the sheet bend is its tendency to slip if not properly tightened or if the lines are of vastly different diameters. It may also loosen over time with repeated fluctuations in load. This can be a concern in dynamic sea conditions where tension on lines frequently changes, such as towing.
- Tips: Always ensure the working end is on the same side as the longer standing part to prevent slipping. For added security, especially with slippery lines, consider using a double sheet bend. This variation adds an extra turn, providing additional friction and reducing the risk of the knot loosening.
Double Sheet Bend
- How to Tie: Begin by tying a standard sheet bend as described above. Once the initial knot is formed, make an additional round turn with the working end around both parts of the bight before tucking it under itself again. This extra turn adds security to the knot. Tighten the knot securely by pulling on both standing parts to ensure it is snug and properly set.
- Strengths: The double sheet bend offers enhanced security over the single sheet bend, especially useful with lines of unequal size or slippery material. The additional turn provides extra friction. This prevents the knot from loosening under variable loads, making it a more reliable choice in many boating scenarios.
- Weaknesses: While the double sheet bend is more secure, it is slightly more complex to tie. This might be a disadvantage in urgent situations where speed is paramount. Additionally, it can be more difficult to untie after bearing a heavy load, which might be a consideration if you anticipate needing to adjust your lines frequently.
- Tips: Use this knot when you anticipate changes in tension or when using particularly smooth or slippery lines. Ensure both turns are snug and properly tightened to maximize security. Practicing this knot beforehand can help ensure you can tie it quickly and confidently when needed, especially when you already master the standard sheet bend.
Fisherman’s Knot
- How to Tie: To tie a fisherman’s knot, lay the two line ends alongside each other, going in opposite directions. Form an overhand knot with one line around the standing part of the other. Repeat this process with the second line around the standing part of the first line. Slide the two overhand knots together and tighten them securely.
- Strengths: The fisherman’s knot is celebrated for creating a secure and compact connection, making it ideal for joining two lines of similar diameter. It is particularly resistant to slipping and jamming. As such, it’s a reliable choice under consistent loads, such as when creating a longer line for mooring or anchoring. It also works well with nylon fishing lines, hence its name. In fact it can also be found under the following names: angler’s knot, English knot, halibut knot, waterman’s knot, or true lovers’ knot.
- Weaknesses: One downside of the fisherman’s knot is that it can be difficult to untie after being subjected to heavy loads. This might be a concern if you need to adjust your lines frequently. Additionally, it is not suitable for lines of significantly different thicknesses, limiting its versatility in some cases.
- Tips: Moisten the lines before tightening to reduce friction and make the knot easier to secure. This knot is best used for critical applications where a non-slipping knot is essential, such as in safety lines or when securing heavy loads.
Double Fisherman’s Knot
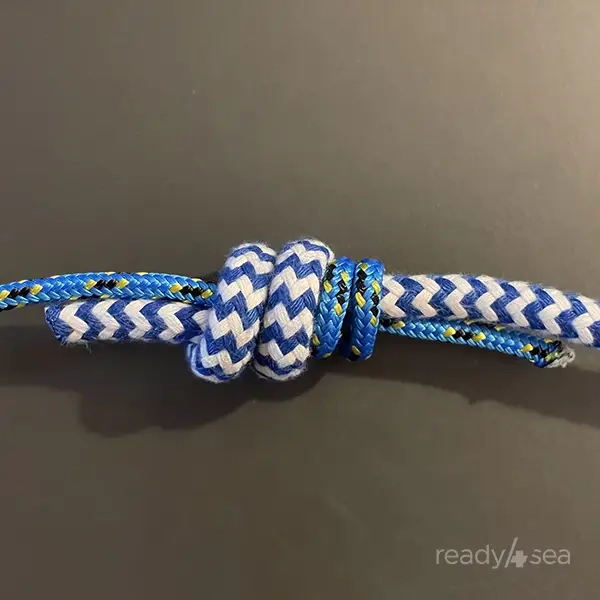
- How to Tie: Start by tying an overhand knot with the first line around the standing part of the second line. Add an additional turn around the standing part of the line. Repeat the process by tying a symmetrical double overhand knot with the second line around the first line. Slide the two knots together and tighten them securely. This creates a very secure and compact knot, ideal for high-stakes situations.
- Strengths: The double fisherman’s knot is extremely secure and resistant to slipping, making it ideal for critical applications where safety is paramount. Its compact nature reduces the risk of snagging. This is particularly useful in complex riggingAll the spars (masts, booms, yards), cables and ropes needed to hold and maneuver the sails. More setups or when lines need to pass smoothly through fairleads.
- Weaknesses: This knot is more complex to tie and can be challenging to untie after bearing a load. This might be a drawback in situations where quick adjustments are necessary. Although it can work with different-sized lines (as pictured), it is best suited for lines of similar diameter.
- Tips: Practice tying this knot beforehand, as it can be tricky to master, especially under pressure. Use it in situations where maximum security is required, such as rescue scenarios. In fact its grip is such that it also bears the name of grapevine knot!
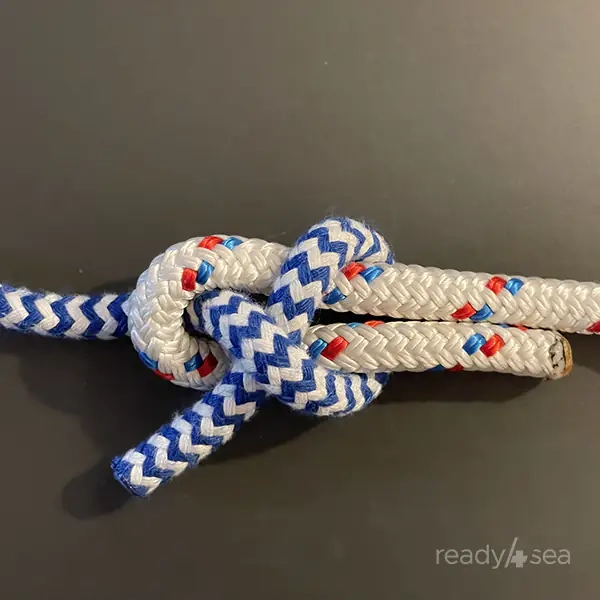
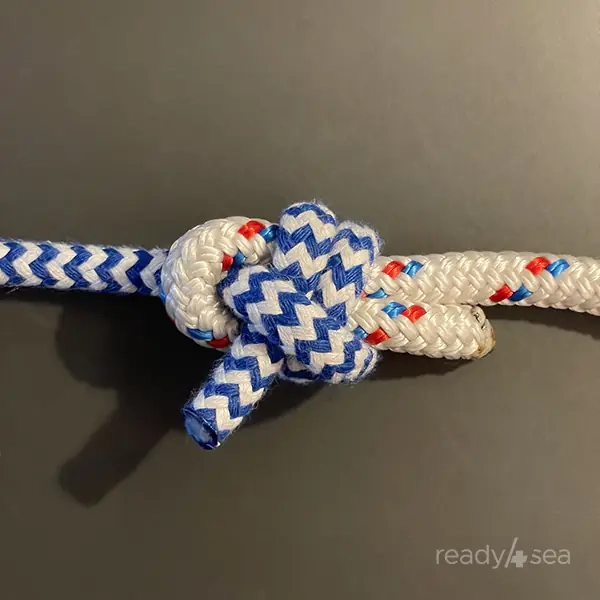
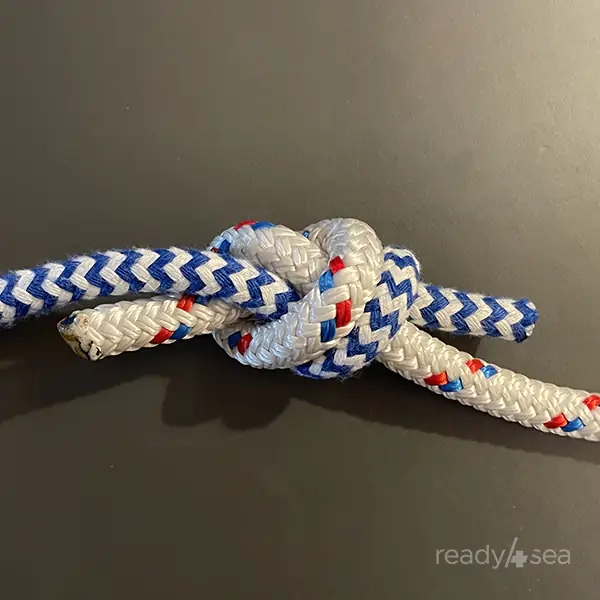
Carrick Bend
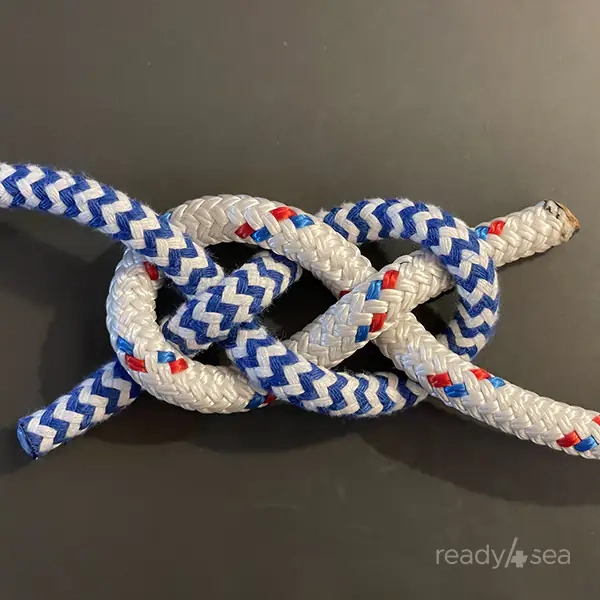
- How to Tie: To tie a carrick bend, form a loop with one line and lay it over the standing part of the second line. Pass the end of the second line over, then under the loop, creating a twisting motion. Tuck the end of the second line back over itself and under the standing part of the first line. Tighten the knot by pulling both standing parts firmly. The knot then “flips” from the flat, decorative layout pictured to a bulkier, three-dimensional shape. This creates a secure and stable knot suitable for heavy loads.
- Strengths: The carrick bend is known for being secure and stable. This makes it suitable for heavy loads and situations where a reliable knot is essential. It allows for joining stiff lines of large diameter. Furthermore, it is also relatively easy to untie, even after bearing significant weight. This considerable advantage is relevant in dynamic boating environments, such as towing.
- Weaknesses: One potential downside is that the carrick bend can be bulky, which might not be suitable for all applications, especially where a more compact knot is desired. It can also be complex to tie correctly, requiring practice to master. This might be a consideration if you need to tie it quickly in urgent situations.
- Tips: Use this knot for joining large or stiff lines where other bends might be less effective. Ensure the knot is dressed neatly to prevent it from capsizing or becoming unstable, which can compromise its integrity and security. Also, for added security, you might want to leave longer working ends than pictured above. In fact, you could even secure them with simple additional half-hitches.
Make sure you don’t miss our next instalments on loops, hitches and other boating knots: subscribe to our monthly newsletter.
Tying It All Together
Mastering these essential bends will enhance your boating experience, providing you with the skills needed to handle a variety of situations on the water. Whether you’re extending a line, making a repair, or securing a load, knowing how to tie these knots will ensure you’re prepared for whatever comes your way. Practice these knots regularly to build your confidence and proficiency, and you’ll be well on your way to becoming a more capable and self-sufficient sailor or boater.
Read On: Our previous article about knots teaches you which stopper knot to use. The next ones cover loops and hitches.