Aluminium Hull Guardian: a Practical Guide to DC Stray Current Detectors
The invisible threat
Aluminium boats offer remarkable advantages: strength, lightness, and durability. Yet they carry a vulnerability that fiberglass and plastic hulls simply do not face. When stray electrical currents find their way into the water through an aluminium hull, the metal itself begins to dissolve. This is not a theoretical risk. A leak of just 0.1 amps can eat through a hull in a matter of months, turning a seaworthy vessel into a liability.
This destruction happens silently. You cannot see the current leaving your boat. You cannot hear it. By the time you notice pitting or white powdery deposits on the hull below the waterline, significant corrosion may already have occurred. This is why a stray current detector is not an optional extra for aluminium boat owners. It is a fundamental piece of safety equipment, as essential as a bilge pump or a fire extinguisher.
Let’s examine how stray current occurs in DC electrical systems, what types of detectors are available, how to install them correctly, and how to track down the most common causes of leaks before they compromise your hull.

The unique DC architecture of aluminium boats
If you have owned a fiberglass boat before, you may need to unlearn some habits. On a plastic hull, the electrical system can be relatively forgiving. The hull is an insulator, so a loose wire touching the inside of the hull causes no particular harm. On an aluminium boat, that same loose wire creates a direct path for current to flow into the water.
The golden rule for aluminium hulls is simple: the hull must never serve as the ground. In a properly wired aluminium boat, the negative bus bar is completely isolated from the hull. Every DC circuit should use double-pole switches, which disconnect both the positive and negative conductors when turned off. This ensures that no part of the circuit remains electrically connected to the boat’s systems when the switch is in the off position.
Why does this matter? Consider a single-pole switch on a cabin light. When you turn it off, the switch breaks the positive wire, but the negative wire remains connected all the way back to the battery. If that negative wire chafes against the hull anywhere along its length, the hull becomes part of the return path. Current flows through the aluminium and into the water, and corrosion begins immediately.
This is why aluminium boat owners must be vigilant about wiring practices. Any modification to the electrical system, whether installing a new chartplotter or adding a cabin fan, must respect the principle of isolation. The negative wire goes to the bus bar, never to the hull.
How the detector works
A stray current detector serves one purpose: it tells you whether electrical current is leaving your hull and entering the water. Different detectors accomplish this in different ways.
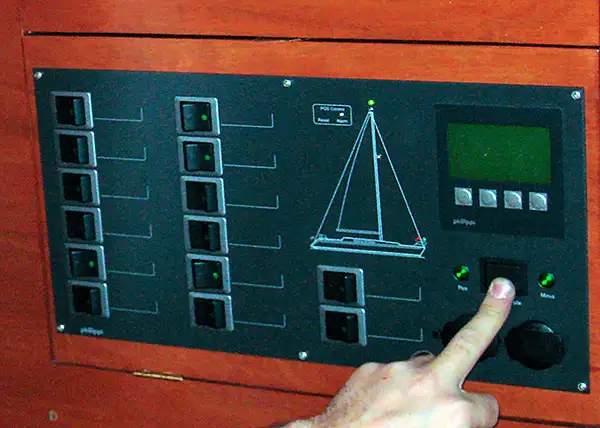
Hull isolation testers generally have three connections: positive and negative from the DC system, plus a connection to the hull. Push-button LED types temporarily connect the hull to the on-board DC system for testing. If both LEDs illuminate equally, the hull is properly isolated from the DC system. If only one LED lights up, or if one is dimmer than the other, it means one of the DC potentials is already connected to the hull, signalling a fault.
This device tests the integrity of the electrical isolation rather than measuring voltage potential through the water, which is a simple, inexpensive yet functional way to detect issues. Some models add a gauge that shows the degree of leakage/isolation. Some also include an audible alarm that sounds beyond a given threshold.
A more sophisticated option is the reference electrode monitor. This type uses a permanent electrode mounted in the water, typically made of silver or silver chloride, to establish a stable reference point. The detector measures the voltage difference between the hull and this reference electrode. The reading appears in millivolts, allowing you to establish a baseline and watch for deviations. Many models include an audible or visual alarm that triggers when the voltage exceeds a preset threshold.
Installation: getting it right
Correct installation of a stray current detector is as important as getting one in the first place. A poorly installed detector may give false readings, fail to detect genuine leaks, or even create a new path for current to escape.
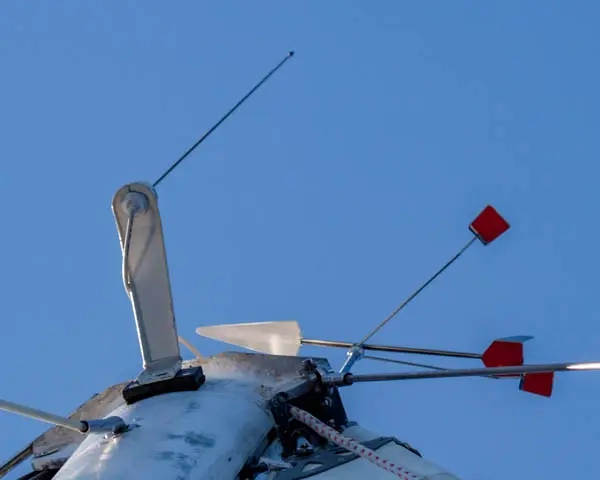
One common mistake is placing the reference electrode too close to the propeller. The propeller and shaft create a strong electrical signature, especially if the shaft is bonded to the hull or if the propeller has its own anode. Move the electrode away from propellers, rudders, through-hull fittings, and sacrificial anodes to get an accurate hull reading.
Before relying on the detector, calibrate it. In clean water with all electrical systems off, the reading should be close to zero. Follow the manufacturer’s procedure to set this baseline. If the detector shows a significant offset even with everything off, investigate before proceeding. You may already have a leak, or the electrode may be improperly placed.
Beyond these broad pointers, always follow the specific installation recommendations of your manufacturer.
Troubleshooting: the “usual suspects”
When your detector signals a problem, the real work begins. Finding the source of a stray current leak requires patience and a systematic approach. Over years of maintaining aluminium boats, we’ve seen certain culprits appear repeatedly.
The battery charger and inverter are prime suspects. These devices convert power and contain internal components that can fail in ways that leak DC current. If your detector shows a spike whenever the charger or inverter is running, even when the boat is disconnected from shore power, the fault likely lies inside the unit. Have it tested or replaced by a qualified technician.
Aftermarket electronics are another common source. A stereo, GPS(Global Positioning System) Satellite positioning system with worldwide coverage, enabling users to determine not only their latitude and longitude, but also their heading and speed. More unit, or auxiliary light installed by someone unfamiliar with aluminium boat wiring may have the negative wire connected to the hull instead of the bus bar. This creates a constant low-level leak that gradually corrodes the hull. If you notice a gradual rise in your detector reading over days or weeks, check any recently installed equipment.
The water heater (calorifier) can develop a cracked element that allows current to leak into the water tank. Since the tank is often bonded to the hull, this current finds a path to the water. A sudden spike when the heater activates points to this appliance.
Bilge pumps operate in a harsh environment. Corroded wiring, a failed float switch, or current leaking through the pump housing can all introduce stray current. Because bilge pumps cycle intermittently, the leak may appear and disappear unpredictably. Watch your detector when the pump runs.
The VHF(Very High Frequency) Radio wave frequency band, between 30 and 300 MHz. By extension, the most widespread marine radio sets, operating on a series of predetermined channels between 156 and 174 MHz, with a range of a few miles to a few dozens of miles. More antenna is an often-overlooked culprit. The coaxial cable creates a link between the radio and the antenna, and damage to the cable or a fault in the antenna tuner can allow DC current to leak through the mounting hardware. Since the antenna mast is typically metal and may be bonded to the hull or mast, this creates a direct path for current to escape. If you have a persistent low-level leak that does not respond to switching off breakers, disconnect the VHF(Very High Frequency) Radio wave frequency band, between 30 and 300 MHz. By extension, the most widespread marine radio sets, operating on a series of predetermined channels between 156 and 174 MHz, with a range of a few miles to a few dozens of miles. More power feed and see if the reading changes. You may need to ensure your antenna mount is insulated from the mast or pulpits.
The windlass operates in a wet, corrosive environment. Wiring inside the motor housing can degrade, or the solenoid can fail in a way that leaks current to the anchor roller and thus to the hull. A leak that appears when you operate the windlass, or that worsens after the boat has been in rough water where spray reaches the windlass, suggests this component.
Finally, old wiring itself can be the problem. Insulation degrades over time, especially in damp bilges. A wire that has rubbed against the hull for years may eventually wear through its insulation and create a contact point. If your detector shows a constant low-level reading that persists even with all breakers off, you may need to methodically identify the faulty wire and then trace it inch by inch.
Routine maintenance and monitoring
A stray current detector only protects you if you pay attention to it. Make checking the detector part of your daily routine, whether at the dock, at anchor or underway. A quick glance takes seconds and can reveal a developing problem before it becomes serious.
Once a month, verify that the alarm functions correctly. Some detectors have a test button that simulates a leak. If yours does not, you can briefly create a controlled test by connecting a known resistive load between the hull and the water, but only if you understand the procedure and have the appropriate equipment.
If your detector uses one, clean the reference electrode regularly. Algae, slime, and mineral deposits can coat the electrode and block the electrical connection. A gentle scrub with a soft brush restores accuracy.
Integrate the detector check into your pre-departure checklist (try out Ready4Sea if you haven’t got one yet). Before casting off, confirm that the reading is normal and that no alarms are active. This simple habit can save you from discovering a corroded hull when the boat is hauled for maintenance.

© Wikimedia Commons
What about other metal hulls ?
Steel boats face similar electrical challenges, but the severity differs. Steel is more noble than aluminum on the galvanic series, so stray currents corrode it more slowly. What takes months on an aluminum hull could take years on steel. However, years is not a safe timeframe for a boat owner, and the corrosion can still be structurally dangerous.
The primary victims also differ. On an aluminum boat, the hull itself dissolves. On a steel boat, the propeller, shaft, and rudder are often the first casualties. These components are typically bronze or stainless steel. Stray current flowing from the hull to these appendages will destroy them rapidly.
Therefore, the fundamental rules remain the same. The negative bus must be isolated from the hull. Double-pole switches are required. Stray current detectors are highly recommended. The cost of prevention is always lower than the cost of a new propeller or hull repairs.
Safety is not optional
Aluminium boats reward their owners with strength, longevity, and performance. They also demand a different mindset. The electrical system on an aluminium vessel is not merely a convenience. It is a potential threat to the very structure of the boat, but a very easily monitored one.
A stray current detector is your first line of defense. It transforms an invisible danger into something you can see, measure, and address. The cost of a detector is a fraction of the cost of repairing a corroded hull. More importantly, it buys you peace of mind.
If you own an aluminium boat and do not yet have a detector, install one. Learn your baseline reading. Check it regularly. And if the alarm ever sounds, track down the source immediately. Your hull depends on it.
For more guidance on maintaining your boat’s electrical systems and protecting your investment, explore the Ready4Sea blog for additional articles on corrosion prevention, battery management, and seasonal maintenance checklists.